“`markdown
Fix Focusrite Channels Not Showing Up: The Ultimate Guide
Seeing your Focusrite channels disappear in your music software can disrupt your creative flow. This comprehensive guide provides detailed solutions, troubleshooting tips, and step-by-step instructions to quickly restore your channels. Whether you’re a seasoned professional or just starting your musical journey, these fixes are designed to address this common issue.
Focusrite Channels Not Showing Up: A Comprehensive Troubleshooting Guide
If your Focusrite interface isn’t displaying all its channels in your Digital Audio Workstation (DAW), don’t panic. This issue is often easily resolved. Let’s get those missing channels back so you can resume your music production activities. Here’s what you need to know about Focusrite audio interface troubleshooting.
1. Driver Issues: Updating and Configuring Your Drivers
The most common cause is outdated, corrupted, or incorrectly configured drivers. Drivers are the software that enables communication between your computer and the interface. Think of them as translators; if the translation is faulty, communication breaks down.
- Download Latest Drivers: Visit the official Focusrite website, locate your specific interface model, and download the latest drivers compatible with your operating system (Windows or macOS).
- Double-Check Compatibility: Ensure you’re downloading the correct version of the driver for your specific operating system and interface model.
- Uninstall Previous Drivers: Before installing the new drivers, uninstall any previous versions. This prevents conflicts.
- Restart Computer: After the driver installation is complete, restart your computer. This ensures the new drivers are properly loaded.
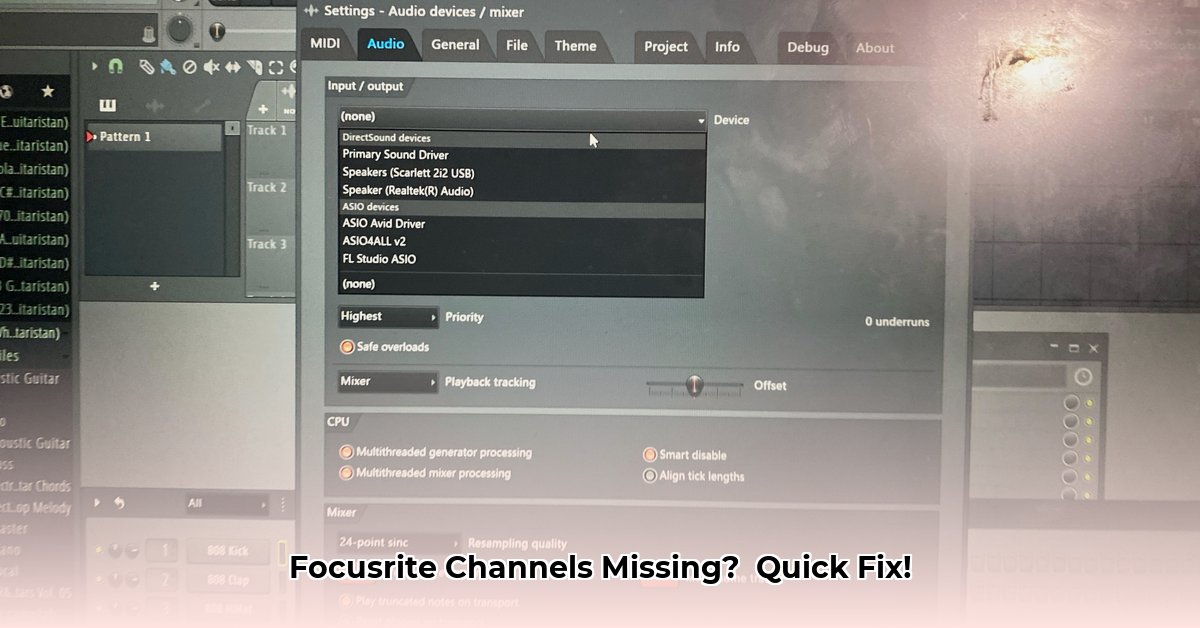
2. ASIO vs. MME/DirectSound: Choosing the Right Driver Type
When configuring your DAW, you’ll often encounter ASIO, MME, and DirectSound driver options (Windows). ASIO (Audio Stream Input/Output) is generally preferred by audio professionals because it offers significantly better performance and lower latency (the delay between playing a note and hearing it). MME (Multimedia Extensions) and DirectSound are simpler but may result in higher latency.
- ASIO (Recommended): If you’re on Windows, always try ASIO first. It provides the best performance.
- Experiment: If ASIO isn’t working correctly (e.g., you hear crackling or distortion), try switching to MME or DirectSound in your DAW’s audio settings. Test each to see which provides the most stable performance.
- macOS: On macOS, Core Audio is the native audio driver and generally works seamlessly.
3. DAW Configuration: Ensuring Your Software Recognizes Your Focusrite
Your DAW needs to recognize your Focusrite interface like introducing two friends. Here’s how to ensure your Digital Audio Workstation (DAW) – such as Ableton Live, Logic Pro X, Pro Tools, Cubase, or Studio One – is properly configured:
- Open Audio Settings: Launch your DAW and navigate to the audio settings. This is usually found under “Preferences,” “Settings,” “Options,” or a similar menu item. Then, look for the “Audio” section.
- Select Interface: Within the audio settings, select your Focusrite interface as both the audio input and output device. Your DAW will then send and receive audio through your selected Focusrite interface. If you see multiple entries for your Focusrite, select the one with the ASIO driver.
- Enable Channels: Look for a section to enable or configure input and output channels. Make sure all the physical inputs and outputs on your Focusrite interface are enabled in your DAW. This is often found under “Input Config” and “Output Config”.
- Check Channel Counts: Verify your DAW shows the correct number of input and output channels corresponding to your Focusrite interface. If channels are missing, manually add them within your DAW’s audio settings, consulting your DAW’s manual for specific instructions.
- Sample Rate and Buffer Size: Ensure the sample rate selected in your DAW matches the sample rate configured in your Focusrite Control software (more on that below). Also, adjust the buffer size to balance performance. Lower buffer sizes reduce latency but can strain your computer’s resources. Higher buffer sizes increase latency but provide more stability. A setting of 128 or 256 samples is a good starting point.
4. Focusrite Control/Mix Control: Utilizing the Interface’s Control Panel
Most Focusrite interfaces come with dedicated control software, such as Focusrite Control (for newer interfaces) or Scarlett Mix Control (for older Scarlett models). This software provides comprehensive control over your interface’s settings.
- Open and Check: Ensure the appropriate control software is installed and running alongside your DAW.
- Routing: Examine the routing options within Focusrite Control/Mix Control. This software allows you to route audio signals from physical inputs to virtual outputs, and vice versa. Verify that your inputs are correctly routed to your DAW.
- Muting and Gain: Double-check that none of your input channels are muted within Focusrite Control/Mix Control. Also, verify the input gain levels for each channel.
- Direct Monitoring: Use the direct monitoring feature (if available) for near-zero latency monitoring of your inputs.
5. Advanced Troubleshooting: Addressing Complex Technical Issues
If you’re still experiencing problems, consider the following advanced troubleshooting steps:
- Cable Integrity: Inspect all cables (USB, Thunderbolt, XLR, TRS) connecting your Focusrite interface to your computer and other audio equipment. Damaged or faulty cables can cause intermittent connection issues. Try different cables to rule out this possibility.
- Restart Sequence: Power cycle your entire system. Turn off your computer, the Focusrite interface, and any connected peripherals. Wait a few minutes, then power everything back on in the following order: Focusrite interface, computer, DAW.
- Software Conflicts: Temporarily disable or uninstall any other applications that might be using audio resources, such as video conferencing software, media players, or virtual audio devices.
- Operating System Compatibility: Confirm your operating system (Windows or macOS) is fully compatible with your Focusrite interface and the latest drivers. Check the Focusrite website for compatibility information.
- USB Port Considerations: Experiment with different USB ports on your computer. Some USB ports may offer better performance than others. Avoid using USB hubs if possible; connect your Focusrite interface directly to a USB port on your computer. Also, try using a USB 2.0 port instead of a USB 3.0 port, or vice-versa.
- DPC Latency Checker (Windows): On Windows, use a DPC Latency Checker tool to identify potential driver conflicts or hardware issues that might be affecting audio performance.
- System Information: Review the System Information or System Report on your computer (depending on your operating system) to see if your Focusrite interface is being recognized correctly.
- Firewall/Antivirus: Ensure your firewall or antivirus software isn’t blocking the Focusrite Control software or the audio drivers.
- Reset Focusrite Control: In Focusrite Control’s File menu, there might be an option to reset the software to its default settings. Note that this will remove any custom routings or configurations.
- Dual Boot: If possible, try connecting your Focusrite interface to another computer to see if the issue persists. This can help determine whether the problem lies with the interface itself or the configuration of your primary computer.
- Focusrite Support: If you’ve exhausted all other troubleshooting steps, visit the official Focusrite support website. They offer a knowledge base, FAQs, and contact options for direct technical assistance.
6. Best Practices for a Smooth Recording Session
- Power Management: Ensure your Focusrite interface is receiving sufficient power. If it requires an external power supply, make sure it’s properly connected and functioning. If it’s powered via USB, try a different USB port or a powered USB hub.
- Firmware Updates: Regularly check the Focusrite website for firmware updates for your interface. Firmware updates often include performance improvements and bug fixes.
- DAW Updates: Keep your DAW updated to the latest version. Software updates often include compatibility improvements and bug fixes.
- Project Backup: Regularly back up your DAW projects to prevent data loss in case of unexpected issues.
- Monitor Calibration: Calibrate your studio monitors to ensure accurate audio reproduction.
- Room Acoustics: Address any acoustic issues in your recording environment to improve the quality of your recordings.
Following these steps should resolve the issue. With patience, you’ll have those channels up and running again in no time. Happy music-making!
How to Fix Focusrite Scarlett ASIO Driver Issues in Ableton Live
Key Takeaways:
- Maintaining up-to-date drivers is essential for resolving many ASIO driver problems.
- A stable, direct USB connection is critical for optimal performance.
- Proper configuration within Focusrite Control and Ableton Live’s audio settings is crucial.
- Troubleshooting involves systematically checking each potential source of the issue.
If your Focusrite Scarlett interface isn’t showing up or functioning correctly in Ableton Live, this guide provides a step-by-step approach to resolving common Ableton audio interface problems.
1. Verify Your Driver Version
Outdated drivers are a frequent cause of ASIO driver issues. Make sure you have the latest Focusrite Scarlett drivers installed. Visit the Focusrite website and download the drivers specifically designed for your operating system and Scarlett model. Uninstall any previous versions before installing the new ones to avoid potential conflicts.

- How to Stop Apps From Running in the Background to Boost Your - December 1, 2025
- How To Move Apps On Your Droid For Better Organization - November 30, 2025
- How to Move Apps on Android for Better Organization - November 29, 2025