Want to turn your model kits into seriously impressive works of art? This guide will show you how! We’ll cover everything from the basics – simple techniques anyone can master – to advanced tricks that will make your models look incredibly realistic. You’ll learn why certain techniques work best, understand different approaches, and get tips from the experts, no matter your skill level. We’ll even show you where to find the best supplies and keep your skills up-to-date, so you’re always improving. This isn’t just a list of steps; it’s a complete system to help you master model weathering and bring your creations to life. Let’s dive in!
Weathering Models: Turning Your Models into Realistic Masterpieces – Detailed Guide
Let’s talk about transforming your models from plain replicas into realistic, believable creations, and achieving those realistic weathering effects on your scale models. We’ll explore the art of weathering, adding the subtle signs of age and wear that make all the difference. Ready to take your model building to the next level and explore advanced weathering techniques?
Getting Started: Washes and Drybrushing – The Foundation of Realistic Wear and Model Accuracy
For many model builders, washes and drybrushing are the first steps to creating convincing weathered effects using basic weathering techniques. They’re simple techniques, but they’re the foundation for adding that touch of realism to your scale model hobby.
Washes: The Subtle Art of Color Layering and Realistic Details
Think of washes as a thin, transparent layer of color. They’re like adding a soft, shaded glow to your model, providing depth and highlighting shadows. The trick is to dilute your acrylic paints with water – a little goes a long way. Too much water, and it’ll be watery. Too little, and it’ll be thick and gloppy. A good idea is to practice on a scrap piece first to perfect your mix before tackling your actual model. Experiment with different ratios until you achieve the desired consistency, where the wash flows smoothly into recesses without beading or running excessively. Consider adding a drop of dish soap to your wash mixture to reduce surface tension and improve flow.
Drybrushing: Highlighting the Worn Edges and Creating Weathered Appearance
Drybrushing creates the impression of wear and tear on raised surfaces and edges. Grab a stiff-bristled brush and barely dip it into your paint – just enough to lightly coat the bristles. Now, very gently “skim” the brush across your model’s surface. You’re not actually painting; you’re just barely touching the edges to highlight certain areas. Before applying to your model, remove excess paint by dabbing the brush on a paper towel until it appears almost dry. This prevents clumping and ensures a subtle, textured effect. Experiment with different brush types (flat, round, filbert) to achieve varying effects.
Leveling Up: Pigments and Chipping – Adding Depth and Detail with Advanced Weathering
Once you’re comfortable with washes and drybrushing, you can explore more advanced weathering methods. Pigments and chipping allow you to create highly realistic wear patterns.
Pigments: Building Layers of Grime and Rust and Realistic Effects
Pigments are like a powdered paint. They’re really useful for building layers of dirt, rust, and grime. Unlike paints, they’re not smooth – they have a texture that adds realism to your scale models. Apply pigments with a soft brush, building up thin layers for a natural look. For a more permanent effect, mix pigments with a binder or thinner before applying. Experiment with different application techniques, such as stippling or swirling, to create unique textures. Consider using different pigment colors to simulate variations in dirt and rust.
Chipping: Showing Realistic Wear and Tear and Model Authenticity
Chipping adds that beaten-up look showing years of exposure to the elements. You can carefully remove small bits of existing paint to reveal underlying layers. Use a hobby knife, a sharpened toothpick, or even a small piece of sponge. Focus on places that would naturally wear down – edges, corners, and around hatches and access panels. Apply small, irregular chips, rather than large, uniform ones. Consider using a masking technique to create precise and controlled chipping effects. Vary the color of the underlying layers to simulate different levels of wear and corrosion.
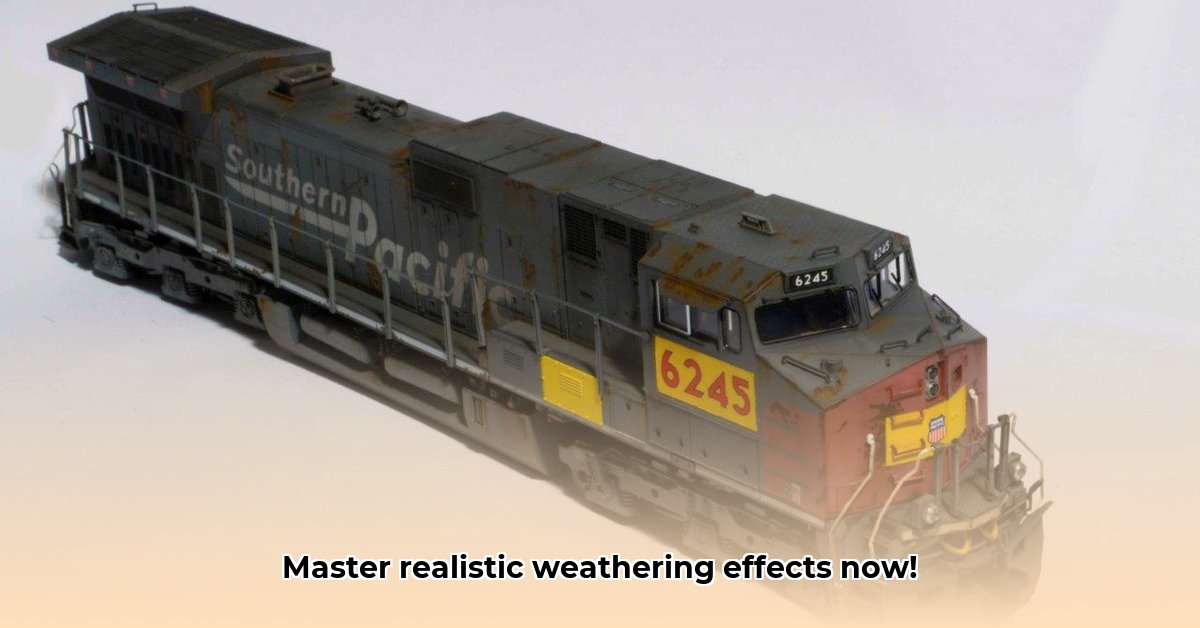
A Step-by-Step Guide: Creating a Rusty Metal Effect – Effective Weathering Method
Let’s go through a specific example: creating a convincing rusty metal surface. This is a fairly simple technique you can easily adapt to your projects.
Step 1: Laying the Foundation with Base Coat
Begin by priming your model with a dark base coat. A dark grey or black base provides the perfect dark canvas for the weathering effects to show up. Ensure the base coat is smooth and even for optimal results. Consider using an airbrush for a more controlled and professional finish.
Step 2: Applying the Rust Wash
Next, apply a rust-colored wash. Thin coats are key here. Patience is important, letting each layer completely dry before applying another. Use a dedicated rust wash product or create your own by diluting rust-colored acrylic paint with water or thinner. Apply the wash liberally, allowing it to flow into recesses and around details.
Step 3: Highlighting with Drybrushing
Now, drybrush with a lighter rust color, focusing on edges and raised areas. These are the places that would naturally show wear first. Use a stiff-bristled brush and remove excess paint before applying to your model. Apply light, controlled strokes to highlight the edges and raised surfaces.
Step 4: Adding Shadows and Depth
For extra depth, carefully apply a thin dark brown or black wash. Thin coats are still the key here, and let everything dry thoroughly. Focus on areas where shadows would naturally occur, such as corners and around details. Allow the wash to dry completely before proceeding to the next step.
Step 5: Emphasizing Wear with Pigments
Finally, add some rust-colored pigment to areas of extreme wear. Use a stiff brush, and dab the pigment onto the surface where you want to concentrate the effects. Consider using different shades of rust pigment to create variations in color and texture. Seal the pigments with a fixative or varnish to prevent them from rubbing off.
Comparing Techniques: A Quick Overview
Here’s a helpful table that summarizes the different weathering techniques and their pros and cons:
| Technique | Difficulty Level | Realism Level | Best Use Cases | Materials Required |
|---|---|---|---|---|
| Washes | Easy | Low-Medium | Subtle aging, adding shadows, creating overall tones | Acrylic paints, water/thinner, brush |
| Drybrushing | Easy | Low-Medium | Highlighting, showing wear on edges and raised areas | Stiff-bristled brush, paint, paper towel |
| Pigments | Medium | Medium-High | Building layers of dirt, rust, grime, and other textures | Pigments, brushes, binder/thinner (optional) |
| Chipping | Medium-Hard | High | Showing significant damage, creating heavily worn areas | Hobby knife, sponge, paint, masking tape (optional) |
Beyond the Basics: Your Weathering Journey to Scale Model Artistry
Mastering weathering is an ongoing process, a journey of exploration and experimentation. Constantly trying new techniques and combinations is crucial for finding your own unique style. Study real-world examples – photos of weathered objects can be a great source of inspiration. Visit museums, examine historical vehicles, and observe the effects of weather on different materials. The most important thing? Don’t be afraid to experiment and make mistakes. Learning from mistakes is the fastest way to develop your skills. Document your progress and keep a record of your techniques and results. So grab your brushes, have fun, and let your creative side take over!
Best Model Weathering Techniques for Resin Cast Models for Enhanced Durability
Key Takeaways:
- Mastering best model weathering techniques for resin cast models enhances realism and increases durability.
- Simple washes and dry brushing are excellent starting points.
- Advanced techniques like chipping and prototype-specific weathering add depth and realism.
- Material choice significantly influences technique selection and weathering behavior.
- Experimentation and practice are crucial for improvement.
Getting Started: Simple Yet Effective Techniques
Let’s start with the basics – techniques perfect for beginners and a great foundation for more advanced work. Resin is a relatively smooth surface, so these gentle approaches will create a convincing aged look without overwhelming the detail of your model.
- Washes: Think of washes as liquid shadows that adds depth. They settle into recesses, highlighting details. Dilute acrylic paints with water or a dedicated wash medium. Apply thinly and let gravity do the work. Experiment with different colors to mimic rust, grime, or oil stains. Apply the wash using a fine-tipped brush, focusing on panel lines, rivets, and other recessed details.
- Drybrushing: This is your go-to technique for highlighting raised areas. Load a stiff-bristled brush with a small amount of paint. Wipe off most of the paint on a rag so only a tiny amount remains. Then, lightly “scratch” the brush across raised surfaces. You’ll get a subtle, textured effect that simulates wear. Use a light color that contrasts with the base coat to create a more pronounced effect.
- Pastels/Pigments: Want to add dust and grime

- Windows App to Stop Apps Running in Background Saves Battery - February 2, 2026
- How To Spot Android Apps Running In The Background - February 1, 2026
- Android App to Stop Background Apps and Save Battery - January 31, 2026